The Studio
Disclaimer: This post is not about Seth Rogen’s one-shot-self-indulgent-must-watch-show.

Hundreds of years ago, when I used to live in Rio, a friend of mine who played guitar kept reiterating that he had to sit down and record some songs. Another friend of mine and I kept telling him to just pick up the guitar and do it, but his standard answer was:
“I can’t. I need to update my guitar’s strings, I need to buy this pedal, I need to have this amp, I need a room with better acoustics, I need to buy a post-processing software to edit the songs, I need a new computer that can run this post-processing software…”
The number of “reasons” was so high and absurd that it became an internal joke for procrastination: First you need to build a Studio.
The Studio
Every single time I think about sitting down to write something, or even while I’m sitting down writing something, an excuse comes by. Right now, for example, it’s the wobbly table, but there are many many many other excuses like needing to decompress before thinking on a subject; available time to actually write; English not being my native tongue; Portuguese feeling strangely uncomfortable; the black shadow behind me screaming that I’m about to get disturbed; the thought that pretending to be a writer is a waste of time; that the outcome of all of this effort is practically zero; the list goes on and on and on, and all of them are kind of a version of
The Studio
And even when I abstract all of that, the logistics throw me back on the ground. Where do I write? Where do I publish? What if I switch blogs like I did a million other times (RIP Posterous)? Can I trust Notion with all my data? Can I even trust myself considering I changed my workflow multiple times? It doesn’t end. It never ends, and all of them are just another version of
The Studio
Then one day, during the last holiday break I decided to do something. Did I accept that all the reasons above were excuses, grab a laptop and kick off the most amazing Christmas novel? No. I’m sorry to disappoint you, but this is not a redemption story, so don’t even dream about a character overcoming their fears and galloping straight into the sunset while carrying their beloved typewriter. Quite the opposite, this is a post that shows the amount of hurdles I put in my way just to avoid writing. This is a story about how I built
My Own Studio.
Buckle up, it’s gonna get boring. And when it does
💡 look for these along the way.
Technical Documentation: Automated Notion-to-GitHub Synchronization Pipeline
1. Architectural Objectives
The primary directive was establishing a secure, cloud-to-cloud synchronization pipeline between a Notion database and a GitHub repository. A strict constraint was the absolute avoidance of local authentication credentials on the host workstation.
2. Notion Database Schema
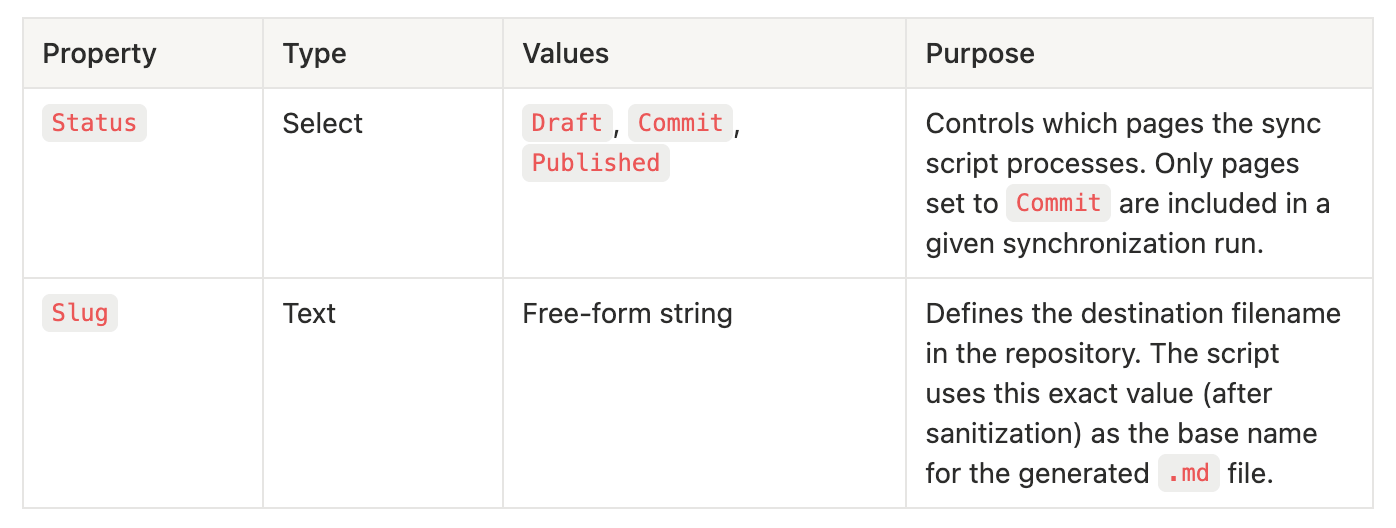
The synchronization source is a Notion database where each page represents a single post. Two custom properties govern the automation workflow:
💡 Yay, you made it here. While I’m not sure if you tried to read the technical specs above, let me tell you about the Thing that I’ve been using to fall asleep for the last five or more years.
3. Implementation Phases
Phase 1: Environment Initialization and Credential Isolation
The development environment was bootstrapped using GitHub Codespaces. This architectural choice ensured all script execution and authentication occurred entirely on remote servers, satisfying the strict requirement to keep personal credentials off the primary work machine.
Authentication for both platforms was established strictly through secure cloud variables, eliminating the need for local configuration:
Notion Authentication: An Internal Integration Secret was generated via the Notion developer portal. This token provides scoped access to the target workspace.
GitHub Secrets Management: To securely provision the runtime environment, the Notion token was stored directly in the GitHub repository settings as an encrypted secret named
NOTION_KEY. The specific database identifier was similarly stored asNOTION_DB_ID.Execution Environment: The synchronization logic runs via GitHub Actions. This native runner automatically handles GitHub authentication internally to commit the Markdown files. Simultaneously, the workflow securely injects the
NOTION_KEYandNOTION_DB_IDinto the Node execution environment, enabling authorized requests to the Notion API while keeping all credentials completely isolated from the codebase and the local workstation.
💡 I’m kind of fascinated by remakes and how the same story can be told in a multitude of ways, and the one that always gets stuck in my mind is the movie The Thing.
Phase 2: Core Script Development and Data Sanitization
A custom JavaScript file, sync.js (below), was developed to interface with the Notion API. Initial execution revealed a TypeError exception during the parsing of the Notion payload, which was systematically debugged and resolved. To guarantee filesystem compatibility, a rigorous string sanitization function was added, ensuring all generated Markdown filenames contained only valid characters.
Phase 3: Chronological File Structuring
To maintain an organized repository structure for the Substack publications, a chronological ordering system was implemented. The script accesses the Notion page creation date and prepends a YYYYMMDD prefix to the filename of every generated Markdown document.
Phase 4: Orphan File Management and Audit Logging
Reconciling the state between the remote repository and the Notion database required a non-destructive approach to missing files. The initial concept of purging the entire output directory was rejected. Instead, an audit mechanism was built. The script identifies orphan files (documents present in the GitHub repository but absent from the current Notion synchronization batch) and appends these specific filenames to a persistent SYNC_LOG.md file to maintain a clear audit trail.
💡 You probably heard about John Carpenter’s The Thing released in 1982. That movie was based on a short novel published in 1938 called Who Goes There?, which was first turned into a movie back in 1951 called The Thing from Another World. And let’s not forget that we also had a prequel released in 2011 that bombed.
Phase 5: Bidirectional State Reconciliation
Upon successful file commit to GitHub, the script updates the original Notion page property, automatically reverting the status from Commit back to Draft. This closes the automation loop and resets the workflow for future iterations.
script.js
Just in case you want to procrastinate and do something similar, here is the script. To be clear, I did not write any of it. Google Gemini did. I did review and iterate a fair amount, though.
const { Client } = require("@notionhq/client");
const { NotionToMarkdown } = require("notion-to-md");
const fs = require("fs");
const path = require("path");

const notion = new Client({ auth: process.env.NOTION_KEY });
const n2m = new NotionToMarkdown({ notionClient: notion });

async function run() {
  const dbId = process.env.NOTION_DB_ID;
  const outputDir = path.join(__dirname, "posts");

  // 1. Safe Setup
  if (!fs.existsSync(outputDir)) {
    fs.mkdirSync(outputDir);
  }

  // 2. Snapshot current files for the Log
  const existingFiles = fs.readdirSync(outputDir).filter(f => f.endsWith(".md"));
  const newlyWrittenFiles = new Set();

  // 3. Fetch pages that are ready to Commit
  const response = await notion.databases.query({
    database_id: dbId,
    filter: {
      property: "Status",
      status: { equals: "Commit" }
    }
  });

  // 4. Process Loop
  for (const page of response.results) {
    const title = page.properties.Name.title[0]?.plain_text || "Untitled";
    const createdDate = page.created_time.split('T')[0];
    let slug = page.properties.Slug.rich_text[0]?.plain_text || page.id;
    slug = slug.replace(/[^a-z0-9-]/gi, '_').toLowerCase();

    const filename = `${createdDate}-${slug}.md`;
    newlyWrittenFiles.add(filename);

    console.log(`Syncing: ${title} -> ${filename}`);

    const mdblocks = await n2m.pageToMarkdown(page.id);
    const mdString = n2m.toMarkdownString(mdblocks);
    const content = typeof mdString === 'string' ? mdString : mdString.parent;

    if (content) {
      // Step A: Save file
      fs.writeFileSync(path.join(outputDir, filename), content);

      // Step B: Reset Status to 'Draft'
      await notion.pages.update({
        page_id: page.id,
        properties: {
          "Status": {
            status: { name: "Draft" }
          }
        }
      });
      console.log(`> Notion Status reset to 'Draft'`);
    }
  }

  // 5. APPEND Log Results
  const orphans = existingFiles.filter(file => !newlyWrittenFiles.has(file));
  const timestamp = new Date().toISOString().replace('T', ' ').split('.')[0]; // Cleaner format

  let logEntry = `\\n### Run: ${timestamp}\\n`;
  logEntry += `- Synced: ${newlyWrittenFiles.size} new/updated files\\n`;

  if (orphans.length > 0) {
    logEntry += `- ⚠️ Orphans Detected (Files in repo but not in Notion batch):\\n`;
    logEntry += orphans.map(f => `  - [ ] ${f}`).join("\\n") + "\\n";
  } else {
    logEntry += `- Status: Clean batch (No orphans found relative to existing files)\\n`;
  }

  logEntry += `--------------------------------------------------\\n`;

  // Append to the file (creates it if it doesn't exist)
  fs.appendFileSync("SYNC_LOG.md", logEntry);

  console.log("Sync complete. Log updated.");
}

run().catch(console.error);
💡 Hopefully you skipped all the code above. Anyway, I’ve read the original novel, watched all of those movies and while the plot stays mostly the same with an alien killing a bunch of isolated people, the themes behind them are drastically different.
4. Operational Execution Protocol
Executing the synchronization pipeline requires a precise sequence of actions spanning both the Notion interface and the GitHub repository console.
Step 1 — Document Preparation and Slug Definition: Within the Notion workspace, the target page must be prepared for export. The user must populate the Slug property. The synchronization script utilizes this exact text string to formulate the final destination filename in the repository.
Step 2 — State Modification: Once the content and slug are finalized, the user must update the Status property of the Notion database item. Changing this value strictly to Commit flags the document as ready for the extraction payload.
Step 3 — Workflow Invocation via GitHub Actions: Following the Notion preparation, the user must transition to the GitHub web interface. The user navigates to the Actions tab within the designated repository and selects the specific synchronization workflow. To initiate the pipeline, the user manually triggers the execution using the Run workflow control.
Step 4 — Pipeline Execution and State Reversal: Upon invocation, the GitHub Action provisions the runtime environment and executes the core script. The system processes the Markdown conversion, commits the newly generated file using the defined slug, and automatically issues a PATCH request to the Notion API. This final operation reverts the document status back to Draft, cleanly resetting the operational cycle for future publications.
💡 You can go back to the original post now, and I’ll get back to The Thing later.
It’s all integrated and I’m free to write something
Of course not! Because while the Studio was fully functional, it was feeling kinda empty. So what did I do? Did I fill up this emptiness with dozens of new posts? Nope. Instead, I decided to Tenet myself back in time and find all the stuff I had written over the years. This means multiple old blogs, some of them no longer online, which means I had to go through email archives, OneDrive, Google Drive, whatever drive you can think of and scavenge those words out of archives forcing cloud companies to fetch from some unused long term storage system. I just hope I didn’t trigger any on call alert during the holidays.
Now you can imagine that all of those posts from multiple sources have different formats and nothing is in .md. If you think I uploaded them as they were and started writing, you clearly haven’t been paying attention. Instead, I decided to write a ton of self-contained format conversion websites to migrate years of old content into the previously defined format.
Here is what it turned out to be. This time fully supported by Claude Code.
Markdown Conversion Tools: Technical Reference
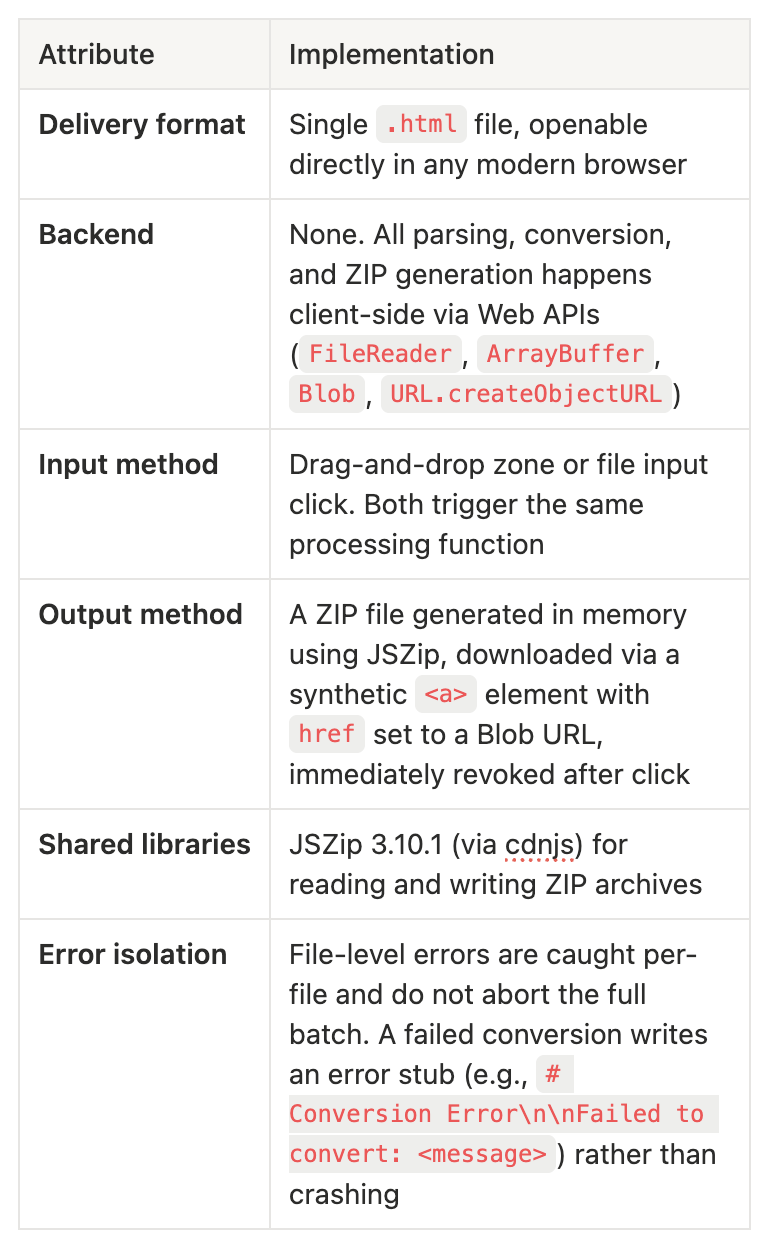
Three standalone HTML tools were built to convert legacy writings from different source formats (DOCX, Blogger, MBOX) into .md files suitable for a GitHub repository. All three tools share the same architectural pattern: a single self-contained .html file that runs entirely in the browser, with no server, no build step, and no installation. External libraries are loaded from CDNs at runtime.
💡 Back to The Thing. The interesting part of all those versions is how the era in which they were written dictates the theme.
Common Architecture
All three tools share the following structure:
💡 In the original pre-WWII novel, it’s all about optimism and science. Badass scientists use science to catch an alien which is also building its own spaceship. The scientists win, and they all live happily ever after.
Tool 1: DOCX to Markdown Converter
Source format: .zip containing one or more .docx files Output format: .zip containing one .md per input .docx Additional library: mammoth.js 1.6.0 (via cdnjs)
Processing Pipeline
Input validation: Confirms the uploaded file ends with
.zip. Rejects anything else before attempting to parse.ZIP extraction (JSZip): Calls
JSZip.loadAsync(file)wherefileis the rawFileobject from the input event. IteratesObject.keys(zip.files)to enumerate all entries. Filters to entries matching: extension ends with.docx(case-insensitive), path does not start with__MACOSX(macOS metadata artifacts), and path does not include/.(hidden files).DOCX extraction: For each qualifying DOCX path, calls
zip.files[path].async('arraybuffer')to extract the raw binary content as anArrayBuffer.HTML conversion (mammoth.js): Passes the
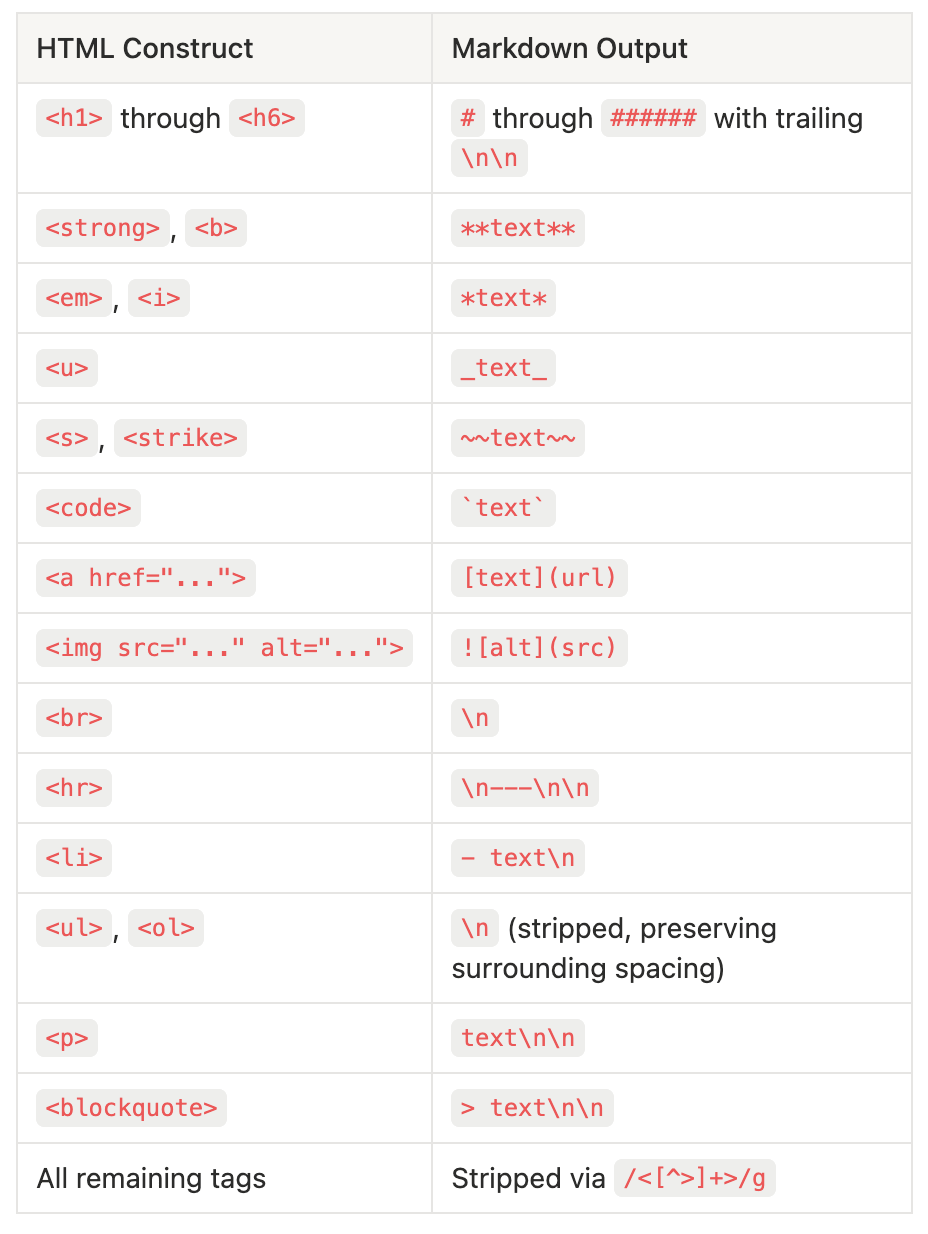
ArrayBuffertomammoth.convertToHtml({ arrayBuffer: docxData }). Mammoth internally parses the Office Open XML format, extracts the document body, and returns an HTML string. Mammoth is used for this step because it natively understands OOXML structure (relationships, styles, numbering); attempting to parse DOCX directly with regex would be unreliable.HTML-to-Markdown conversion (custom): Mammoth’s output is HTML, not Markdown. A custom
htmlToMarkdown()function applies a sequential series of regex replacements to the HTML string. The order is significant: block-level elements are processed before inline cleanup and before stripping remaining tags.
💡 Then comes the 1951 movie, throws all of that optimism down the drain. Say hello to the Cold War, clearly pointing towards an armed to the teeth military base that favors shooting above all else. The military wins, but they aren’t so optimistic anymore, instead, they are aware and in constant watch of the sky with a very clear reference to the Soviet Union and their nuclear bombs.
After tag removal, HTML entities are decoded ( → space, & → &, < → <, > → >, " → "). A final pass collapses three or more consecutive newlines to two (\\n{3,} → \\n\\n). The result is trimmed.
Filename mapping: Output files are named by replacing the
.docxextension with.md. In the final version, filenames were prefixed with aYYYY-MM-DDdate based on a manually provided mapping derived from file metadata. Files not present in the mapping received the prefix200X-XX-XX.Output ZIP assembly: Each converted Markdown string is added to a new JSZip instance via
outputZip.file(mdFileName, markdown). After all files are processed,outputZip.generateAsync({ type: 'blob' })produces the final ZIP blob, which is downloaded asconverted-markdown.zip.
Limitations
Tables in DOCX are not converted; mammoth may produce HTML table tags, which
htmlToMarkdown()will strip, losing table structure.Embedded images inside DOCX are not extracted; mammoth’s default
convertToHtmldoes not output image data, so images are dropped silently.The date prefix mapping was hardcoded for a specific set of files and does not generalize automatically.
💡 Then in 1982, John Carpenter gets back to the original source and creates a masterpiece putting everyone in mega paranoia. The leaders you thought you could rely on go crazy, and in the end, you realize you can’t trust anyone. The ending is as bleak as it gets: you burned your house down, and when you can’t even trust yourself, the best option is to just wait to die.
Tool 2: Blogger to Markdown Converter
Source format: .zip (Google Takeout export) or .xml (direct Blogger backup) containing an Atom feed Output format: .zip with a /posts/ folder and a /media/ folder Additional library: JSZip only (no XML parsing library; uses the browser’s native DOMParser)
Input Format Detection
The tool handles three input variants:
Google Takeout ZIP: Contains a file at a path matching
/feed.atomor.atom. The tool scans all entries withObject.entries(zip.files)and identifies the feed by checkinglowerPath.endsWith('feed.atom')orlowerPath.endsWith('.atom').Direct Blogger XML export ZIP: Contains a
.xmlfile whose content includes<feedor<entry. The tool reads candidate XML files and checks for these strings before accepting.Raw
.xmlfile (not zipped): Read directly as text viafile.text().
Media files (jpg, jpeg, png, gif, webp, svg, mp4, webm, mp3, wav, pdf) present in the ZIP are collected into a mediaFiles dictionary keyed by path for later use.
Atom XML Parsing
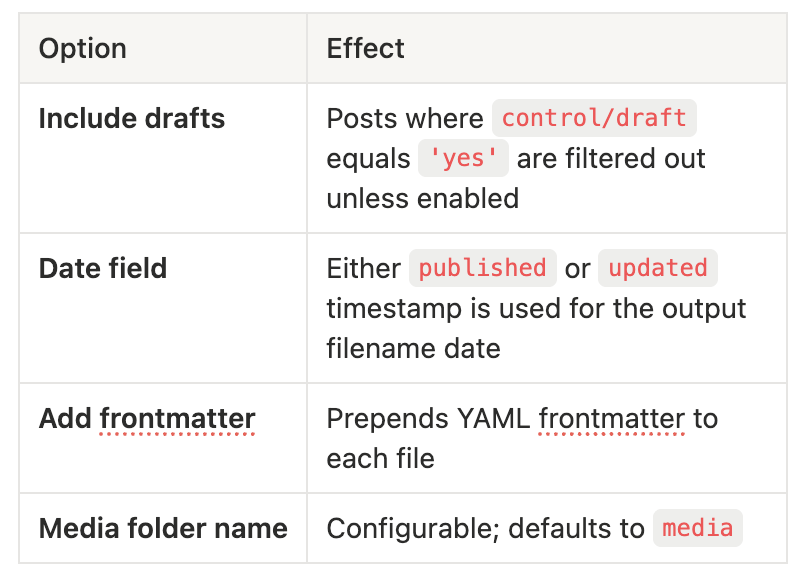
The feed XML is parsed using the browser’s native DOMParser with 'text/xml' MIME type. All <entry> elements are queried via querySelectorAll('entry'). For each entry, the following fields are extracted: title (text content), content (text content; contains raw HTML from Blogger), published and updated (ISO 8601 timestamps), author/name, all <category> elements (as { term, label } pairs for tags), all <link> elements (as { rel, href } pairs for the original post URL), and control/draft (determines draft status).
💡 Fast forward to 2011 and what you have is a prequel that basically tries to piggyback on a successful movie and hopefully create a franchise to exploit. Same set pieces and dozens of easter eggs. It’s popcorn, doesn’t add much, and it’s not a surprise that you probably don’t remember the movie. It’s forgettable.
Post Filtering and Configuration
Filename Generation
For each post: the date string is parsed with new Date(dateStr) and formatted to YYYY-MM-DD via .toISOString().split('T')[0]. The title is passed through sanitizeFilename(), which converts to lowercase, replaces accented characters with ASCII equivalents (e.g., à → a, ñ → n, ç → c), replaces any non-alphanumeric sequence with -, strips leading/trailing dashes, and truncates to 100 characters. The output filename is YYYY-MM-DD-sanitized-title.md.
Media Handling
For each image tag found in a post’s HTML content: the src attribute is extracted via regex, the filename is taken from the last path segment of the URL (stripping query strings), and the image filename is sanitized using the same sanitizeFilename() function. A per-post media subfolder path is constructed as media/YYYY-MM-DD-slug/. The image tag in the HTML is replaced with a Markdown image reference: . The ../ prefix is required because .md files are inside /posts/ and media is at the root /media/. A relative path without ../ would resolve to /posts/media/, which is incorrect. Images hosted externally (e.g., on blogger.googleusercontent.com) are not downloaded; the reference is kept but the file will not be present locally.
💡 Which brings me to the thought that puts me to sleep: if someone wrote a new version today, what would it look like?
HTML-to-Markdown Conversion
The same regex-based approach as Tool 1, with the following key differences:
<pre><code>blocks are converted to fenced code blocks (triple backticks).<hr>tags are converted to**instead of--. This is a critical difference:--in Markdown can be parsed as a YAML frontmatter delimiter or a setext-style heading underline, both of which would corrupt the output.**is an equivalent horizontal rule that avoids this ambiguity.The double newline after the closing
--frontmatter delimiter is explicitly enforced to prevent the first content line from being misread as part of the frontmatter block.
YAML Frontmatter
When enabled, prepended as:
---
title: "Post Title"
date: 2024-01-15
tags: [tag1, tag2]
author: Author Name
url: <https://original-post-url>
---
Tags are extracted from <category> elements whose term attribute does not contain # (Blogger uses #-prefixed terms for internal schema categories).
Output Structure
blogger-markdown-export.zip
├── posts/
│   ├── 2024-01-15-post-title.md
│   └── 2024-02-20-another-post.md
└── media/
    ├── 2024-01-15-post-title/
    │   └── photo.jpg
    └── 2024-02-20-another-post/
        └── header.png
💡 Would it be a post-pandemic world where there’s an alien spreading around us where some of us isolate ourselves from the world waiting for a cure while misinformed ones live their normal lives thinking it’s all a hoax?
Tool 3: MBOX to Markdown Converter
Source format: .mbox file (standard Unix mailbox format) Output format: .zip with flat root-level .md files and a single /media/ folder Additional library: JSZip only (MBOX parsing is fully custom)
MBOX Format and Parsing
MBOX is a plain-text format where individual emails are concatenated in a single file. Each email begins with a line matching From <sender> <timestamp> (the “From_ line,” note the space, not a colon). The parser splits the raw file text on lines matching /^From /m to produce individual raw email strings.
Each raw email is then parsed in two phases:
Phase 1 — Header parsing: RFC 2822 headers are read line by line. A header ends at the first blank line. Header folding (continuation lines starting with whitespace) is handled by appending folded lines to the current header value. Headers are stored in a dictionary keyed by lowercase header name.
Phase 2 — Body and MIME parsing: After the header block, the remaining content is the body. The Content-Type header is examined for boundary= parameters. If present, the body is a MIME multipart message and is split on --<boundary> delimiters. Each part is recursively parsed using parsePart(), which extracts sub-headers and body in the same manner.
MIME Multipart Handling
parsePart() returns an object with { headers, body, filename }. Filename extraction checks both Content-Disposition (for filename= or filename*= parameters) and Content-Type (for name= parameters). URL-encoded filenames (filename*=utf-8''...) are decoded via decodeURIComponent.
Part classification:
Parts with a filename are treated as attachments.
Parts with
Content-Type: text/html(and no filename) are treated as the HTML body.Parts with
Content-Type: text/plain(and no filename) are treated as the plain-text body.Nested
multipart/*parts (e.g.,multipart/alternativeinsidemultipart/mixed) are recursively processed.
💡 Would we switch roles and cheer for the alien who thought it was doing well without bothering anyone until a research base shows up and decides to get in their way?
Content Decoding
Two transfer encodings are handled:
base64: The body string is stripped of all whitespace, then decoded with
atob(). For attachments, the result is converted to aUint8Arrayfor binary-safe ZIP storage.quoted-printable: Soft line breaks (
=\\r\\nor=\\n) are removed. Hex-encoded bytes (=XX) are replaced withString.fromCharCode(parseInt(hex, 16)).
Encoded Header Decoding
Email headers frequently use RFC 2047 encoded-word syntax: =?charset?encoding?text?=. The decodeHeader() function matches this pattern and decodes: B encoding via base64 decoded with atob(), and Q encoding via quoted-printable decoded, with _ treated as a space (per RFC 2047 §4.2).
HTML Body Processing
If the email body is HTML, stripHtml() is applied before writing to Markdown: <style> and <script> blocks are removed entirely (including content), <br> → \\n, </p> → \\n\\n, </div> → \\n, <li> → - , all remaining tags stripped via /<[^>]+>/g, HTML entities decoded ( , &, <, >, ", '), and three or more consecutive newlines collapsed to two.
Markdown Output Format
Each email is serialized by emailToMarkdown() as:
# Subject Line

**From:** sender@example.com
**To:** recipient@example.com
**Date:** Mon, 15 Jan 2024 10:30:00 +0000

**Attachments:** document.pdf, photo.jpg

---

Body text here...
💡 and every night I fall asleep way before Act 1 is over.
Filename and Attachment Conventions
Output .md filenames follow the pattern YYYY-MM-DD-sanitized-subject.md. The date is parsed from the Date header via new Date(dateStr) and formatted to YYYY-MM-DD. sanitizeFilename() replaces characters forbidden on Windows and macOS (<>:"/\\|?* and control characters \\x00-\\x1f) with underscores, collapses consecutive underscores, and truncates to 80 characters.
All attachments are placed in a single flat /media/ folder. To prevent filename collisions when multiple emails have attachments with the same name, each attachment is prefixed with both the email’s date and the sanitized email subject: YYYY-MM-DD-subject-originalfilename.ext.
Output Structure
emails.zip
├── 2024-01-15-email-subject.md
├── 2024-02-20-another-email.md
└── media/
    ├── 2024-01-15-email-subject-document.pdf
    └── 2024-02-20-another-email-photo.jpg
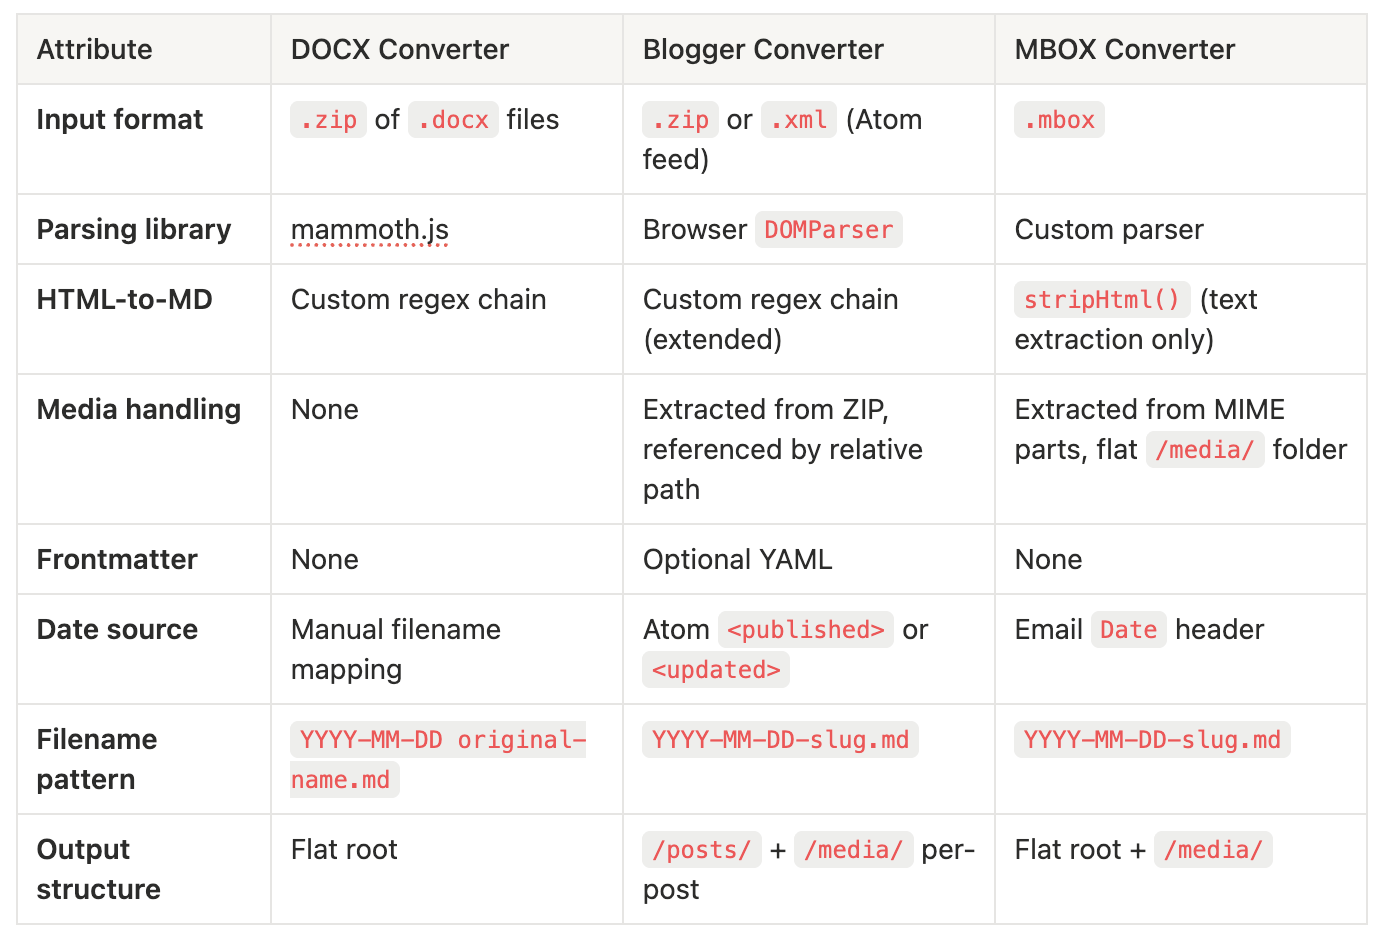
Cross-Tool Comparison
💡 Talking about over, the technical part is done. Get back to the main post and let’s wrap this up.
Am I done? Can I finally start writing?
With all those conversions in, I committed everything to GitHub, and wow. A whole archive with everything I had written over the years, running on a fully functional version of
The Studio
And finally, after setting up this whole beautiful system, I knew exactly what to write. This post. I knew the title, I knew the structure, and at that point I even thought I knew the ending. What I didn’t know was that it would take three months to finish it.
But hey! I did! I did I did I did!
And now that I have a full archive and total control of my own workflow, what’s next?
Not sure yet, but I’ve been playing around with Obsidian and wondering if it would work better than Notion.